Table of Contents: How to Connect Wires with Wire Connectors
- What Are Wire Connectors?
- Tools and Materials You’ll Need
- Step 1: Turn Off the Power
- Step 2: Strip the Wire Ends
- Step 3: Align and Twist the Wires
- Step 4: Attach the Wire Connector
- Step 5: Inspect the Connection
- Step 6: Add Electrical Tape (Optional)
- Step 7: Turn the Power Back On
- Tips for Using Wire Connectors
- Final Connections: How to Connect Wires with Wire Connectors, Done Right
If you’re in the middle of a weekend project that involves installing new light fixtures or tinkering with your home’s electrical system, then chances are that you’ve got your tools laid out, with one crucial task ahead—making those wire connections.
If you’ve ever felt a bit anxious about connecting wires, you’re not alone. But the good news is that wire connectors are the unsung heroes of the electrical world, making it easy to twist together those colorful strands without a hassle. They might be small, but when used correctly, they ensure your connections are secure and safe.
Let’s get ready to dive in and show you how to connect wires with wire connectors, so that you can power up your projects with confidence.
Before starting any electrical project, ensure you follow local electrical codes and safety guidelines. Lighting Warehouse is not responsible for any injuries, damages, or malfunctions caused by improper installation or handling of electrical components. Always consult a licensed electrician if you’re unsure about any steps.
What Are Wire Connectors?
Wire connectors are small, cone-shaped connectors made of insulating plastic with metal threads inside.
They’re designed to twist around the ends of electrical wires, holding them securely in place while insulating the connection to prevent short circuits, electrical shocks, or fire hazards.
Wire connectors come in various sizes and colors to match the number of wires you’re connecting and the wire gauge, making them versatile and suitable for most home electrical projects.
Best Wire Connector Types
Not all wire connectors are created equal, and choosing the right type can make a big difference in the quality of your connection. You should choose the type that fits your project for a secure, long-lasting connection.
Here are a few popular options to consider:
- Standard Twist-On Wire Connectors: The most common type, perfect for everyday household electrical work. These come in various sizes to accommodate different wire gauges.
- Winged Wire Connectors: These have extended grips (wings) for easier twisting, especially when working with multiple wires or in tight spaces.
- Weatherproof Wire Connectors: Ideal for outdoor or moisture-prone areas, these come with a sealant to protect the connection from the elements.
Tools and Materials You’ll Need
Before you start, gather the necessary tools and materials to make your wire connections safely and efficiently:
- Gloves: Protect your hands from sharp wire edges and ensure a better grip while working.
- Wire Connectors: Ensure you have the correct size for your project.
- Wire Strippers: To remove insulation from the wires.
- Utility Knife or Scissors: To trim the wire sheath if needed.
- Pliers (optional): Helpful for holding and twisting wires together.
- Voltage Tester (optional): To confirm that the power is off before starting.
- Electrical Tape (optional): For added protection if desired.
How to Check for Wire Connector Size Compatibility
Using the right size wire connector is crucial for a secure connection. Here’s how to check:
- Check the Packaging: Wire connectors typically come with a size chart, showing the wire gauges and number of wires they can handle.
- Test the Fit: After twisting the wires together, place the wire connector over them. It should twist on smoothly but feel snug. If it’s too loose or tight, switch to a different size.
- No Exposed Wire: Once twisted, no copper should be visible outside the wire connector.
Step 1: Turn Off the Power
The first and most crucial step in any electrical project is to ensure that there’s no power flowing through the circuit you’ll be working on. This step helps prevent electrical shock or damage to the wiring system.
To safely turn off the power, head to your circuit breaker or fuse box:
- Locate the Breaker Box: This is usually found in a garage, basement, or utility room. Once you’ve located it, open the panel.
- Identify the Circuit: Find the breaker that controls the specific area or appliance you’re working on. Breakers should be labeled (e.g., “kitchen lights” or “living room outlets”), so look for the one matching your project area.
- Switch It Off: Flip the corresponding breaker switch to the “off” position. If you’re working with an older fuse box, carefully remove the fuse for the circuit.
- Test for Power: Even after turning off the breaker or removing the fuse, it’s a good habit to use a voltage tester, specifically a multimeter, on the wires to confirm that the power is completely off. This extra step ensures safety before proceeding.
- Make Sure You’re in the Clear: Once the power is off and the wires are confirmed safe to handle, you can proceed.
Step 2: Strip the Wire Ends
For a good wire connection, you need to strip the ends of your wires properly.
- Measure the Length to Strip: Most wire connectors require about ¾ inch of exposed wire to make a secure connection. Check the instructions that come with your wire connectors to be sure.
- Strip the Insulation: Use a pair of wire strippers to remove the appropriate length of insulation from each wire. Be careful not to nick the copper wire underneath, as this could weaken the connection or lead to future issues.
What Goes into Trimming or Stripping Wire Successfully?
Getting the perfect wire trim is key to a solid connection. By properly trimming and stripping, you’ll have a cleaner, safer wire connection that fits perfectly inside the wire connector.
Here’s how to do it right:
- Measure the Right Length: Using your wire connector’s packaging or instructions as a guide, determine how much insulation to strip off. Typically, 3/4 inch to 1 inch is enough, but always check.
- Use Wire Strippers: Select the correct gauge notch on your wire strippers and gently squeeze around the insulation. Rotate slightly, then pull the insulation off to expose the copper wire without nicking or cutting it.
- Inspect the Wire: After stripping, check the exposed wire for any nicks or damage. If you see any, trim the damaged section and strip again. Damaged wire can compromise the connection.
- Twist the Wires Together (If Needed): For multiple wires, twist them tightly together before attaching the wire connector. This ensures a more secure connection.
Step 3: Align and Twist the Wires
Once your wires are stripped and ready, it’s time to align and twist them together.
- Align the Wire Ends: Hold the stripped ends of the wires side by side, so the copper strands are even. For a stronger connection, you can twist the wires together clockwise using your fingers or a pair of pliers. Twisting them before applying the wire connector ensures they’ll hold together securely, even if the connector isn’t perfectly tightened.
- Double Check for Size Compatibility: Make sure you’re using a wire connector that fits the number and gauge of the wires you’re connecting. If the wire connector is too large or too small, it won’t create a secure connection.
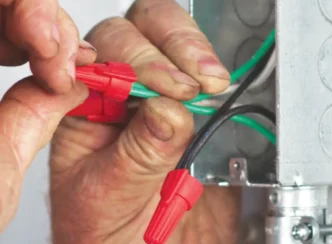
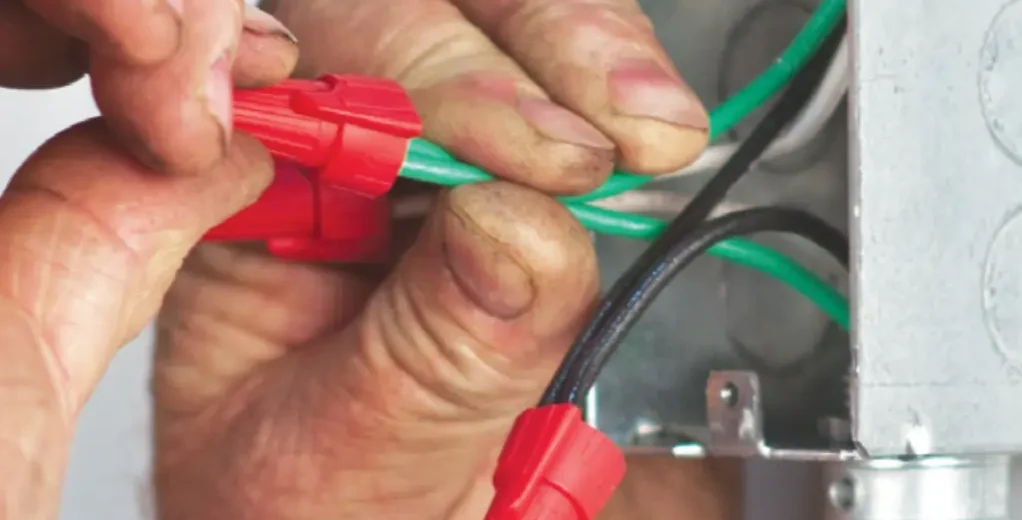
Step 4: Attach the Wire Connector
Now that your wires are prepped and twisted, it’s time to install the wire connector.
- Place the Wire Connector Over the Wires: Position the wire connector over the twisted wire ends.
- Twist the Wire Connector Clockwise: Hold the wire connector firmly and twist it clockwise. You should feel resistance as the connector threads onto the wires. Continue twisting until the connector is tight and the wires no longer move. Generally, the wire insulation should start to twist around the outside of the connector indicating a good, snug fit.
- Check the Connection: Gently tug on each wire to ensure that none of them come loose from the connector. If any wire pulls out easily, remove the connector and repeat the process, making sure to twist the wires more tightly before reapplying the connector.
Step 5: Inspect the Connection
After attaching the wire connector, inspect your work to ensure the connection is solid and safe.
- Check for Exposed Copper: There should be no exposed copper wires sticking out of the wire connector. If you see any copper, unscrew the wire connector, trim the copper wire (not too much!), and retighten the connector.
Step 6: Add Electrical Tape (Optional)
For added protection and peace of mind, you can wrap the wire connector and the first inch of wire with electrical tape.
- Wrap Tightly: Start just below the bottom of the wire connector and wrap the tape tightly around the wires and connector. This can help keep the connection secure and adds another layer of insulation, particularly if the wires are going to be in an outdoor location where they may be jostled or exposed to movement.
Step 7: Turn the Power Back On
Once you’re confident in your wire connector connections, it’s time to restore power to the circuit.
- Turn the Power Back On: Go back to your circuit breaker or fuse box and turn the power back on to the circuit.
- Test the Connection: Use a voltage tester or turn on the fixture or device connected to the circuit to ensure everything is working properly.
Tips for Using Wire Connectors
When it comes to making secure electrical connections, wire connectors are your best friend—but to ensure they perform their job effectively, a few handy tips can go a long way.
- Size Matters: Always match the size of the wire connector to the number and gauge of wires you’re connecting. Using the wrong size can lead to a poor connection or overheating.
- Don’t Reuse Old Wire Connectors: While it may be tempting to save wire connectors from previous projects, it’s best to use new ones. Old wire connectors may have worn threads or may not fit as securely, increasing the risk of a faulty connection.
- Avoid Over-Tightening: Twisting a wire connector too tightly can damage the wires or cause the connector to crack. Tighten until snug, but don’t force it.
- Use the Correct Size Wire Gauge: Make sure the wires you’re connecting are the same gauge (thickness). Connecting wires of different gauges with a single wire connector may not create a secure connection, potentially leading to overheating or failure.
Final Connections: How to Connect Wires with Wire Connectors, Done Right
Wire connectors are an essential tool for making quick and reliable electrical connections, whether you’re installing new light fixtures, replacing outlets, or doing other wiring tasks. By following these steps and best practices, you’ll ensure your wire connections are safe, secure, and long-lasting.
Always remember that when dealing with electrical work, safety is the number one priority—so take your time, use the right materials, and double-check your work.
With the right preparation and a little know-how, wire connector connections can be easy to make and offer a secure solution for many household electrical needs.
This guide is for informational purposes only. Lighting Warehouse is not liable for any issues resulting from the use of wire connectors or other electrical components. If in doubt, seek professional assistance to ensure the safety and effectiveness of your installation.
Join our Insider list and check out the different landscape lighting options that we have to offer.